Hostname: page-component-cd9895bd7-lnqnp Total loading time: 0 Render date: 2024-12-26T18:49:03.989Z Has data issue: false hasContentIssue false

Virtual machine concept applied to uncertainties estimation in instrumented indentation testing

Published online by Cambridge University Press:  29 July 2019

Thierry Coorevits
Affiliation:
Mécanique, Surface, Matériaux et Procédés, MSMP-EA7350, Arts et Métiers ParisTech, F-59800 Lille, France
Stephania Kossman*
Affiliation:
Mécanique, Surface, Matériaux et Procédés, MSMP-EA7350, Arts et Métiers ParisTech, F-59800 Lille, France
Didier Chicot
Affiliation:
Laboratoire de Génie Civil et géo-Environnement, LGCgE-EA4515, Université de Lille, Villeneuve d’Ascq F-59650, France
François Hennebelle
Affiliation:
Université Bourgogne Franche-Comté, F-21000 Dijon, France
Alex Montagne
Affiliation:
Mécanique, Surface, Matériaux et Procédés, MSMP-EA7350, Arts et Métiers ParisTech, F-59800 Lille, France
Alain Iost
Affiliation:
Mécanique, Surface, Matériaux et Procédés, MSMP-EA7350, Arts et Métiers ParisTech, F-59800 Lille, France
*
a)Address all correspondence to this author. e-mail: stephaniakossman@gmail.com
Get access

Abstract

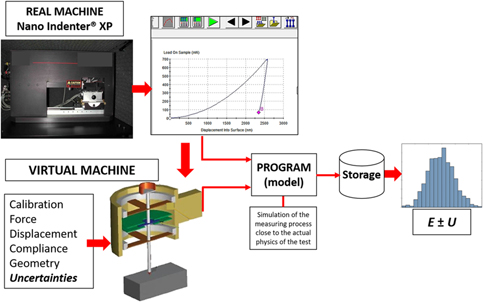
The basis of the virtual machine concept, which is commonly used in coordinate measuring machines, was implemented to determine more realistic uncertainties on the estimation of the elastic modulus obtained from nanoindentation tests. The methodology is based on a mathematical model applied to simulate the testing process and to evaluate the uncertainties through Monte Carlo simulations whose application depends on the studied system (instrument, material, scale, etc.). The methodology was applied to the study of fused silica (FQ) and steel samples tested in a nanoindentation system. The results revealed that the most relevant sources of uncertainty are related to the calibration procedure, particularly to the elastic modulus of the calibration material, and to the contact depth estimation; however, the relevance of the uncertainties is system dependent. This work represents a first insight for a deeper consideration of the uncertainties in instrumented indentation testing.

Type
Article
Copyright
Copyright © Materials Research Society 2019 

Access options

Get access to the full version of this content by using one of the access options below. (Log in options will check for institutional or personal access. Content may require purchase if you do not have access.)

References

Cagliero, R., Barbato, G., Maizza, G., and Genta, G.: Measurement of elastic modulus by instrumented indentation in the macro-range: Uncertainty evaluation. Int. J. Mech. Sci. 101, 161 (2015).CrossRefGoogle Scholar
Ullner, C.: Critical points in ISO 14577 part 2 and 3 considering the uncertainty in measurement. In Proceedings HARDMEKO (Washington D.C., 11–12 November, 2004).Google Scholar
Menčík, J.: Uncertainties and errors in nanoindentation. In Nanoindentation in Materials Science, Nemecek, J., ed. (InTech, London, U.K., 2012).Google Scholar
Menčik, J. and Swain, M.V.: Errors associated with depth-sensing microindentation tests. J. Mater. Res. 10, 1491 (1995).CrossRefGoogle Scholar
BIPM—guide to the expression of uncertainty in measurement (GUM). Available at: https://www.bipm.org/en/publications/guides/gum.html (accessed April 06, 2018).Google Scholar
Herrmann, K., Lucca, D.A., Klopfstein, M.J., and Menelao, F.: CIRP sponsored international comparison on nanoindentation. Metrologia 47, S50 (2010).CrossRefGoogle Scholar
Giusca, C.L., Leach, R.K., and Forbes, A.B.: A virtual machine-based uncertainty evaluation for a traceable areal surface texture measuring instrument. Measurement 44, 988 (2011).CrossRefGoogle Scholar
Sładek, J. and Gąska, A.: Evaluation of coordinate measurement uncertainty with use of virtual machine model based on Monte Carlo method. Measurement 45, 1564 (2012).CrossRefGoogle Scholar
Sładek, J., Ostrowska, K., and Gąska, A.: Modeling and identification of errors of coordinate measuring arms with the use of a metrological model. Measurement 46, 667 (2013).CrossRefGoogle Scholar
Gąska, A., Harmatys, W., Gąska, P., Gruza, M., Gromczak, K., and Ostrowska, K.: Virtual CMM-based model for uncertainty estimation of coordinate measurements performed in industrial conditions. Measurement 98, 361 (2017).CrossRefGoogle Scholar
Ceria, P., Ducourtieux, S., Boukellal, Y., Allard, A., Fischer, N., and Feltin, N.: Modelling of the X, Y, Z positioning errors and uncertainty evaluation for the LNE’s mAFM using the Monte Carlo method. Meas. Sci. Technol. 28, 034007 (2017).CrossRefGoogle Scholar
Xu, M., Dziomba, T., and Koenders, L.: Modelling and simulating scanning force microscopes for estimating measurement uncertainty: A virtual scanning force microscope. Meas. Sci. Technol. 22, 094004 (2011).CrossRefGoogle Scholar
Trenk, M., Franke, M., and Schwenke, H.: The Virtual CMM, a software tool for uncertainty evaluation—Practical application in an accredited calibration lab. In Proceedings of ASPE: Uncertainty Analysis in Measurement and Design (University Park, Pennsylvania, 2004).Google Scholar
ISO/TS 15530-1:2013: Geometrical product specifications (GPS)—Coordinate measuring machines (CMM): Technique for determining the uncertainty of measurement—Part 1: Overview and metrological characteristics.Google Scholar
Joskowicz, L., Ostrovsky-Berman, Y., and Myers, Y.: Efficient representation and computation of geometric uncertainty: The linear parametric model. Precis. Eng. 34, 2 (2010).CrossRefGoogle Scholar
Piratelli-Filho, A. and di Giacomo, B.: CMM uncertainty analysis with factorial design. Precis. Eng. 27, 283 (2003).CrossRefGoogle Scholar
Summerhays, K.D., Baldwin, J.M., Campbell, D.A., and Henke, R.P.: Application of simulation software to coordinate measurement uncertainty evaluation. In Proceedings of ASPE: Uncertainty Analysis in Measurement and Design (University Park, Pennsylvania, 2004).Google Scholar
Sładek, J. and Gaska, A.: Modelling of the coordinate measuring systems accuracy. J. Mach. Eng. 16, 34–46 (2016).Google Scholar
JCGM 101:2008: Supplement 1 to the ‘guide to the expression of uncertainty in measurement’-propagation of distributions using a Monte Carlo method. Available at: http://www.bipm.org/en/publications/guides/gum.html (accessed February 27, 2017).Google Scholar
Oliver, W.C. and Pharr, G.M.: An improved technique for determining hardness and elastic modulus using load and displacement sensing indentation experiments. J. Mater. Res. 7, 1564 (1992).CrossRefGoogle Scholar
Oliver, W.C. and Pharr, G.M.: Measurement of hardness and elastic modulus by instrumented indentation: Advances in understanding and refinements to methodology. J. Mater. Res. 19, 3 (2004).CrossRefGoogle Scholar
Pratt, J.R., Kramar, J.A., Newell, D.B., and Smith, D.T.: Review of SI traceable force metrology for instrumented indentation and atomic force microscopy. Meas. Sci. Technol. 16, 2129 (2005).CrossRefGoogle Scholar
Kim, M.S. and Pratt, J.R.: SI traceability: Current status and future trends for forces below 10 microNewtons. Measurement 43, 169 (2010).CrossRefGoogle Scholar
Fujii, Y.: Method of generating and measuring static small force using down-slope component of gravity. Rev. Sci. Instrum. 78, 066104 (2007).CrossRefGoogle Scholar
Pratt, J.R., Smith, D.T., Kramar, J.A., and Newell, D.B.: Microforce and instrumented indentation research at the national institute of standards and technology, Gaithersburg, MD. In Society for Experimental Mechanics Annual Meeting on Experimental Mechanics (Charlotte, NC, 2003).Google Scholar
Smith, D.T., Shaw, G.A., Seugling, R.M., Xiang, D., and Pratt, J.R.: Traceable Micro-Force Sensor for Instrumented Indentation Calibration, Vol. 1021E (MRS Spring Meeting, San Francisco, California, 2007); pp. 1021-HH1005-1003.Google Scholar
Lawall, J. and Kessler, E.: Michelson interferometry with 10 pm accuracy. Rev. Sci. Instrum. 71, 2669 (2000).CrossRefGoogle Scholar
ISO 14577-2:2015: Metallic materials—Instrumented indentation test for hardness and materials parameters—Part 2: Verification and calibration of testing machines.Google Scholar
Song, J.F., Rudder, F.F., Vorburger, T.V., and Smith, J.H.: Microform calibration uncertainties of Rockwell diamond indenters. J. Res. Natl. Inst. Stand. Technol. 100, 543 (1995).CrossRefGoogle ScholarPubMed
Germak, A. and Origlia, C.: New possibilities in the geometrical calibration of diamond indenters. In XIX IMEKO World Congress (Fundamental and Applied Metrology, Lisbon, Portugal, 2009); p. 1016.Google Scholar
VanLandingham, M.R., Juliano, T.F., and Hagon, M.J.: Measuring tip shape for instrumented indentation using atomic force microscopy. Meas. Sci. Technol. 16, 2173 (2005).CrossRefGoogle Scholar
Pelletier, C.G.N., Dekkers, E.C.A., Govaert, L.E., den Toonder, J.M.J., and Meijer, H.E.H.: The influence of indenter-surface misalignment on the results of instrumented indentation tests. Polym. Test. 26, 949 (2007).CrossRefGoogle Scholar
Fischer-Cripps, A.C.: Nanoindentation, 3rd ed. (Springer, New York, New York, 2011); pp. 2137.CrossRefGoogle Scholar
Crawford, G.A., Chawla, N., Koopman, M., Carlisle, K., and Chawla, K.K.: Effect of mounting material compliance on nanoindentation response of metallic materials. Adv. Eng. Mater. 11, 45 (2009).CrossRefGoogle Scholar
Marteau, J., Mazeran, P-E., Bouvier, S., and Bigerelle, M.: Zero-point correction method for nanoindentation tests to accurately quantify hardness and indentation size effect. Strain 48, 491497 (2012).CrossRefGoogle Scholar
Hogan, R.: Type A and Type B Uncertainty: Evaluating Uncertainty Components (Isobudgets, 2017). Available at: http://www.isobudgets.com/type-a-and-type-b-uncertainty/ (accessed August 03, 2018).Google Scholar
Manual of the Nano Indenter® XP, MTS Systems Corporation.Google Scholar
Huan, Y., Liu, D., Yang, R., and Zhang, T.: Analysis of the practical force accuracy of electromagnet-based nanoindenters. Measurement 43, 1090 (2010).CrossRefGoogle Scholar
Capacitive Displacement Sensors-Nanometrology Solutions: Application note from Physik Instrumente (PI), 2007. Available at: http://www.capacitance-sensors.com/pdf/Cap_Sens_Web_PI_Capacitive_Displacement_Nanometrology_Capacitance_Gauge_Sensor_E.pdf (accessed October 14, 2018).Google Scholar
Nano Indenters: Application note from micro star technologies, 2009. Available at: https://www.microstartech.com/ (accessed October 11, 2018).Google Scholar
Klein, C.A.: Anisotropy of Young’s modulus and Poisson’s ratio in diamond. Mater. Res. Bull. 27, 1407 (1992).CrossRefGoogle Scholar
Gao, C. and Liu, M.: Instrumented indentation of fused silica by Berkovich indenter. J. Non-Cryst. Solids 475, 151 (2017).CrossRefGoogle Scholar
Pharr, G.M. and Bolshakov, A.: Understanding nanoindentation unloading curves. J. Mater. Res. 17, 2660 (2002).CrossRefGoogle Scholar
Loubet, J.L., Bauer, M., Tonck, A., Bec, S., and Gauthier-Manuel, B.: Nanoindentation with a surface force apparatus. In Mechanical Properties and Deformation Behavior of Materials Having Ultra-Fine Microstructures, M. Nastasi, D.M. Parkin, and H. Gleiter, eds.; NATO ASI Series, Series E: Applied Sciences (Springer, Dordrecht 1993); pp. 429447.CrossRefGoogle Scholar
Bec, S., Tonck, A., Georges, J-M., Georges, E., and Loubet, J.L.: Improvements in the indentation method with a surface force apparatus. Philos. Mag. A 74, 1061 (1996).CrossRefGoogle Scholar
King, R.B.: Elastic analysis of some punch problems for a layered medium. Int. J. Solids Struct. 23, 1657 (1987).CrossRefGoogle Scholar
ISO 14577-1:2015: Metallic materials—Instrumented indentation test for hardness and materials parameters—Part 1: Test method.Google Scholar
Greaves, G.N., Greer, A.L., Lakes, R.S., and Rouxel, T.: Poisson’s ratio and modern materials. Nat. Mater. 10, 823 (2011).CrossRefGoogle ScholarPubMed
Romdhani, F., Hennebelle, F., Ge, M., Juillion, P., Coquet, R., and Fontaine, J.F.: Methodology for the assessment of measuring uncertainties of articulated arm coordinate measuring machines. Meas. Sci. Technol. 25, 125008 (2014).CrossRefGoogle Scholar
Kossman, S., Chicot, D., and Iost, A.: Multi-scale instrumented indentation applied to the study of bulk metallic materials. Matér. Tech. 105, 104 (2017).CrossRefGoogle Scholar
Cabibbo, M., Ricci, P., Cecchini, R., Rymuza, Z., Sullivan, J., Dub, S., and Cohen, S.: An international round-robin calibration protocol for nanoindentation measurements. Micron 43, 215 (2012).CrossRefGoogle ScholarPubMed
Chudoba, T. and Griepentrog, M.: Comparison between conventional Vickers hardness and indentation hardness obtained with different instruments. Z. Metallkd. 96, 1242 (2005).CrossRefGoogle Scholar
Harris, P.M. and Cox, M.G.: On a Monte Carlo method for measurement uncertainty evaluation and its implementation. Metrologia 51, S176 (2014).CrossRefGoogle Scholar
Bamber, M.J., Cooke, K.E., Mann, A.B., and Derby, B.: Accurate determination of Young’s modulus and Poisson’s ratio of thin films by a combination of acoustic microscopy and nanoindentation. Thin Solid Films 398, 299 (2001).CrossRefGoogle Scholar
Gadelrab, K.R., Bonilla, F.A., and Chiesa, M.: Densification modeling of fused silica under nanoindentation. J. Non-Cryst. Solids 358, 392 (2012).CrossRefGoogle Scholar
Keryvin, V., Meng, J-X., Gicquel, S., Guin, J-P., Charleux, L., Sanglebœuf, J-C., Pilvin, P., Rouxel, T., and Le Quilliec, G.: Constitutive modeling of the densification process in silica glass under hydrostatic compression. Acta Mater. 62, 250 (2014).CrossRefGoogle Scholar
Herrmann, K., Jennett, N., Wegener, W., Meneve, J., Hasche, K., and Seemann, R.: Progress in determination of the area function of indenters used for nanoindentation. Thin Solid Films 377, 394 (2000).CrossRefGoogle Scholar
Kossman, S., Coorevits, T., Iost, A., and Chicot, D.: A new approach of the Oliver and Pharr model to fit the unloading curve from instrumented indentation testing. J. Mater. Res. 32, 2230 (2017).CrossRefGoogle Scholar
Marteau, J. and Bigerelle, M.: Toward an understanding of the effect of surface roughness on instrumented indentation results. J. Mater. Sci. 52, 7239 (2017).CrossRefGoogle Scholar
Kim, J.Y., Lee, J.J., Lee, Y.H., Jang, J., and Kwon, D.: Surface roughness effect in instrumented indentation: A simple contact depth model and its verification. J. Mater. Res. 21, 2975 (2006).CrossRefGoogle Scholar
Laurent-Brocq, M., Béjanin, E., and Champion, Y.: Influence of roughness and tilt on nanoindentation measurements: A quantitative model: Influence of roughness and tilt. Scanning 37, 350 (2015).CrossRefGoogle Scholar
Zhou, X., Jiang, Z., Wang, H., and Yu, R.: Investigation on methods for dealing with pile-up errors in evaluating the mechanical properties of thin metal films at sub-micron scale on hard substrates by nanoindentation technique. Mater. Sci. Eng., A 488, 318 (2008).CrossRefGoogle Scholar
Hay, J.L., Oliver, W.C., Bolshakov, A., and Pharr, G.M.: Using the ratio of loading slope and elastic stiffness to predict pile-up and constraint factor during indentation. MRS Proc 522 (1998).CrossRefGoogle Scholar
Bolshakov, A. and Pharr, G.M.: Influences of pileup on the measurement of mechanical properties by load and depth sensing indentation techniques. J. Mater. Res. 13, 1049 (1998).CrossRefGoogle Scholar
Lee, Y.H., Hahn, J.H., Nahm, S.H., Jang, J.I., and Kwon, D.: Investigations on indentation size effects using a pile-up corrected hardness. J. Phys. D: Appl. Phys. 41, 074027 (2008).CrossRefGoogle Scholar
Yetna N’jock, M., Chicot, D., Ndjaka, J.M., Lesage, J., Decoopman, X., Roudet, F., and Mejias, A.: A criterion to identify sinking-in and piling-up in indentation of materials. Int. J. Mech. Sci. 90, 145 (2015).CrossRefGoogle Scholar
Supplementary material: File

Coorevits et al. supplementary material

Supplementary material

Download Coorevits et al. supplementary material(File)
File 18.1 KB